How to Roast Beef Tenderloin for a Luxurious Meal

Beef tenderloin, when roasted correctly, offers a melt-in-your-mouth texture and a subtle, refined beef flavor that's perfect for special occasions. The key is searing for a beautiful crust and then roasting to a precise internal temperature to ensure maximum tenderness. A simple herb rub complements the beef without overpowering its delicate flavor profile.
This method of roasting leverages the oven's consistent heat to cook the tenderloin evenly, while the initial searing step locks in the juices and creates a rich, flavorful crust. Resting the meat after roasting is crucial; it allows the muscle fibers to relax and reabsorb the flavorful juices, resulting in a more tender and succulent roast.
Understanding Beef Tenderloin
Beef tenderloin, also known as filet mignon when cut into steaks, is prized for its tenderness and mild flavor. It's a long, narrow muscle located beneath the ribs, and because it doesn't do much work, it's incredibly tender. When buying tenderloin, look for these key factors:
- Grade: USDA Prime is the highest grade, indicating the best marbling and therefore, the most tender and flavorful meat. USDA Choice is a good alternative that's typically more affordable. Avoid "Select" grade, which can be tougher.
- Freshness: The meat should be bright red and firm to the touch. Avoid any cuts that appear dull, brown, or slimy.
- Size: A whole tenderloin typically weighs 4-6 pounds. You can buy a whole tenderloin and trim it yourself, or purchase a center-cut portion for smaller gatherings.
- Trimmed vs. Untrimmed: Tenderloin is often sold "peeled" (completely trimmed of silverskin and fat) or "unpeeled." If you're comfortable trimming, buying untrimmed can save you money.
Why Cook Beef Tenderloin This Way?
- Versatility: Roast beef tenderloin can be served hot or cold, sliced thin for sandwiches, or as the centerpiece of an elegant dinner.
- Flavor: Roasting allows the natural flavors of the beef to shine, enhanced by a simple herb rub that complements without overpowering.
- Convenience: While elegant, roasting beef tenderloin is surprisingly hands-off. A quick sear followed by oven roasting means less time actively cooking.
Preparation (Mise en Place)
- Thawing: If frozen, thaw the tenderloin in the refrigerator for 24-48 hours, depending on its size. Never thaw at room temperature.
- Trimming: Use a sharp knife to remove the silverskin (a thin, silvery membrane) from the surface of the tenderloin. This is important as the silverskin is tough and will shrink during cooking, distorting the shape of the roast. Also, trim off any large pieces of excess fat, leaving a thin layer for flavor.
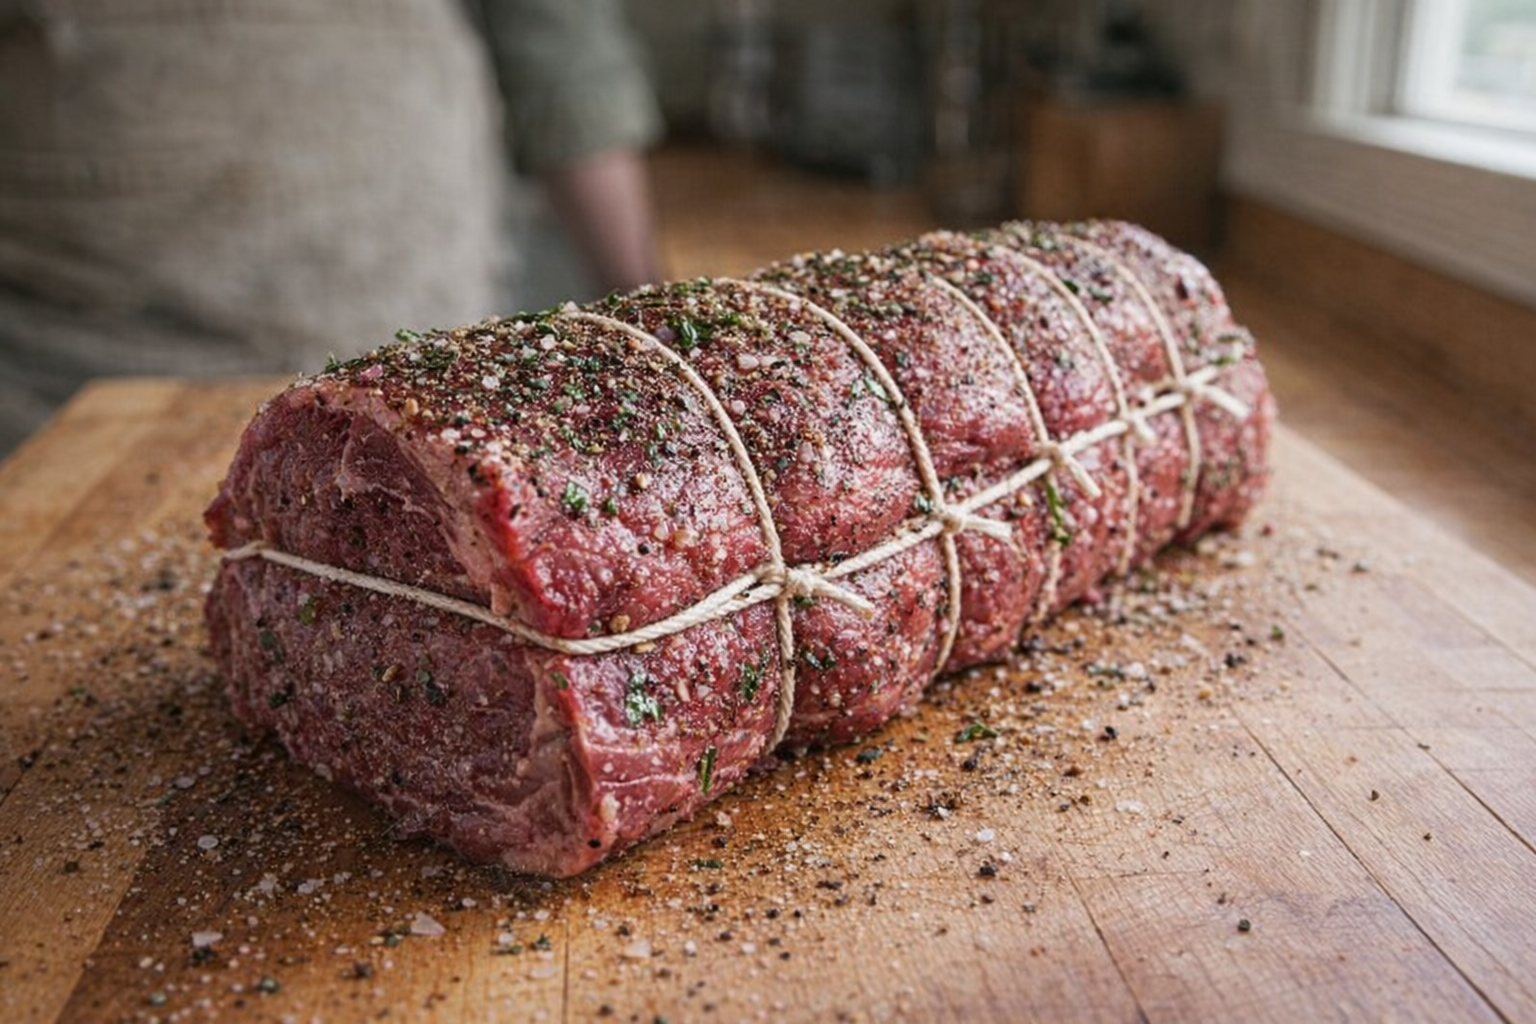
- Tying: Use kitchen twine to tie the tenderloin at 2-inch intervals. This helps the roast maintain a uniform shape during cooking, ensuring even doneness.
- Seasoning: Generously season the tenderloin with kosher salt and freshly ground black pepper. For added flavor, prepare an herb rub with minced garlic, chopped rosemary and thyme, and olive oil. Rub the mixture all over the meat and let it sit at room temperature for at least 30 minutes (up to an hour) before roasting. This allows the salt to penetrate the meat, enhancing its flavor and moisture.
Essential Tools
- Sharp Knife: A sharp knife is crucial for trimming the silverskin and excess fat.
- Kitchen Twine: For tying the roast to ensure even cooking.
- Oven-Safe Skillet or Roasting Pan: A heavy-bottomed skillet or roasting pan is essential for searing and roasting the tenderloin. Cast iron is ideal for its even heat distribution.
- Meat Thermometer: A reliable meat thermometer is essential for ensuring the roast reaches the desired internal temperature.
The Cooking Method(s)
We'll focus on a single, reliable method for roasting beef tenderloin, emphasizing searing for a beautiful crust and precise temperature control for optimal tenderness.
Searing and Roasting for Perfection
Ingredients:
- 1 beef tenderloin (4-6 pounds), trimmed and tied
- 2 tablespoons kosher salt
- 1 tablespoon freshly ground black pepper
- 4 cloves garlic, minced
- 2 tablespoons fresh rosemary, chopped
- 2 tablespoons fresh thyme, chopped
- 1/4 cup olive oil
- 2 tablespoons unsalted butter
- 1 cup beef broth
- 1 cup red wine (optional)
- Preheat the Oven: Preheat your oven to 425°F (220°C). Position a rack in the center of the oven.
- Prepare the Herb Rub: In a small bowl, combine the minced garlic, chopped rosemary, thyme, and olive oil. Mix well.
- Season the Tenderloin: Generously rub the herb mixture all over the tenderloin, ensuring it's evenly coated. Then, season liberally with kosher salt and freshly ground black pepper.
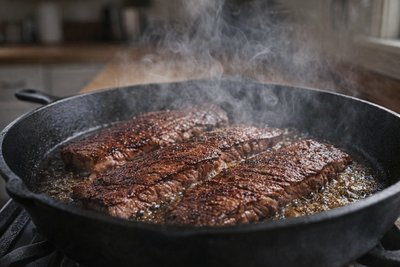
- Sear the Tenderloin: Heat a large, oven-safe skillet (cast iron is ideal) over medium-high heat. Add the butter and allow it to melt and become foamy.
- Sear on All Sides: Carefully place the tenderloin in the hot skillet. Sear it on all sides until deeply browned, about 2-3 minutes per side. The sizzling sound and rich aroma are key indicators of a good sear.
- Roast in the Oven: Transfer the skillet with the seared tenderloin to the preheated oven. Roast until the internal temperature reaches the desired doneness (see "Cooking Time & Doneness Guide" below).
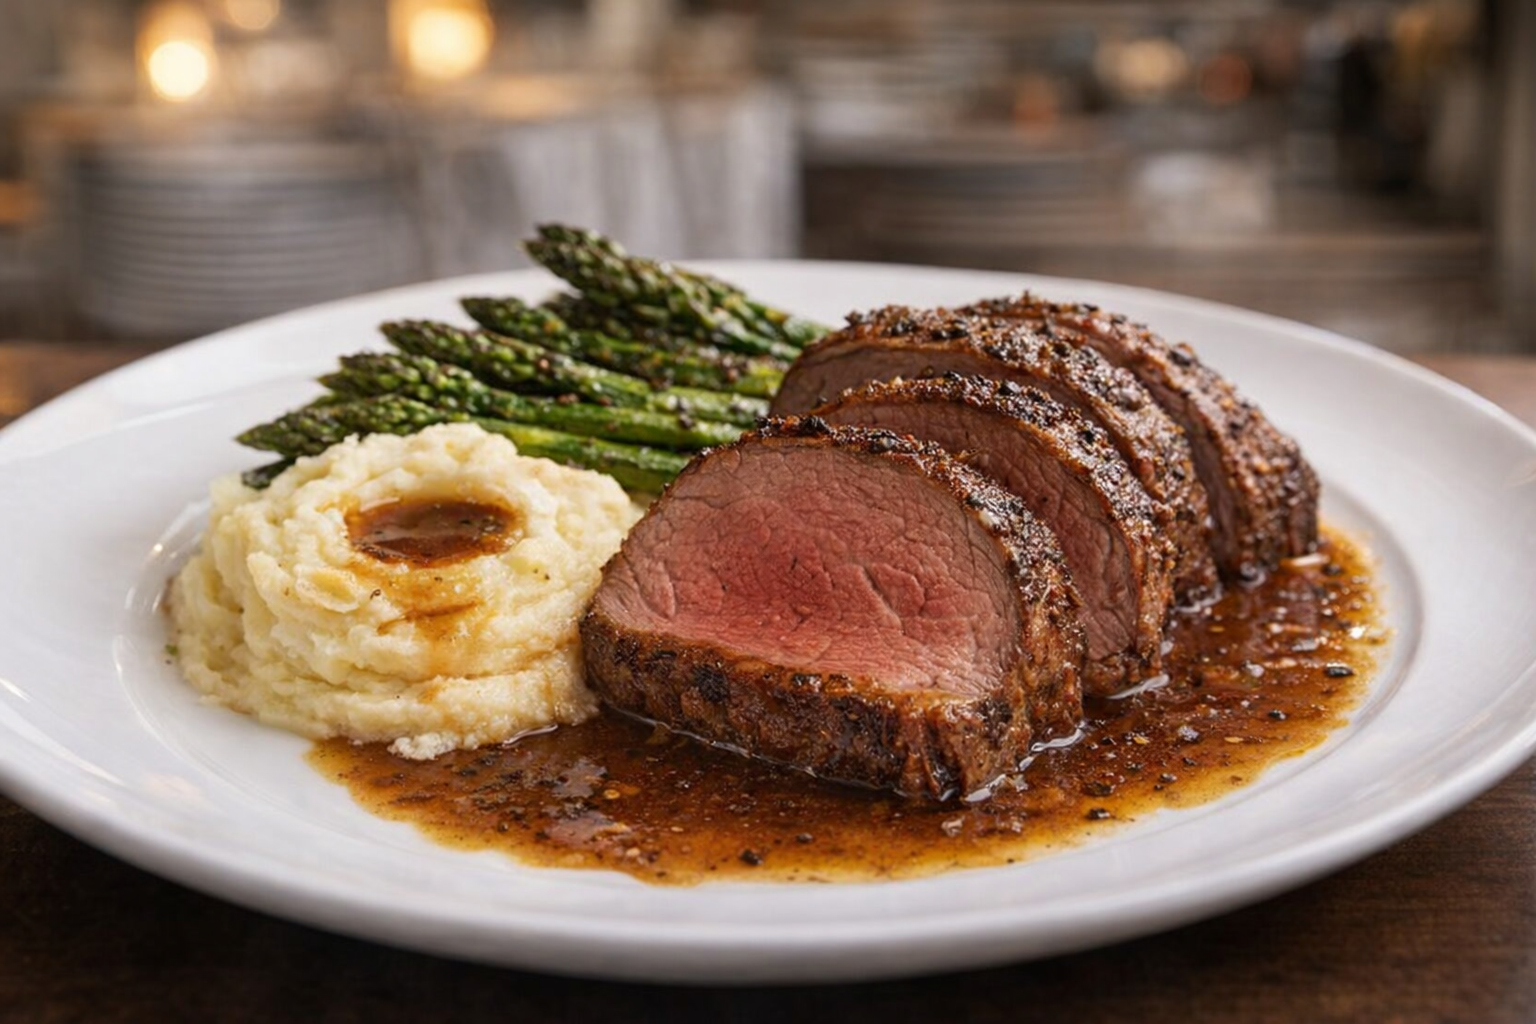
- Rest the Meat: Once the tenderloin reaches the desired temperature, remove the skillet from the oven and transfer the roast to a cutting board. Tent it loosely with aluminum foil and let it rest for 15-20 minutes. This crucial step allows the juices to redistribute, resulting in a more tender and flavorful roast.
- Make the Pan Sauce (Optional): While the meat is resting, place the skillet back over medium heat on the stovetop. Add the beef broth and red wine (if using), scraping up any browned bits from the bottom of the pan (these are packed with flavor!).
- Reduce the Sauce: Bring the mixture to a simmer and cook until the sauce has reduced by about half, about 5-7 minutes. This concentrates the flavors and creates a delicious pan sauce. Strain the sauce through a fine-mesh sieve for a smoother texture (optional). Season to taste with salt and pepper.
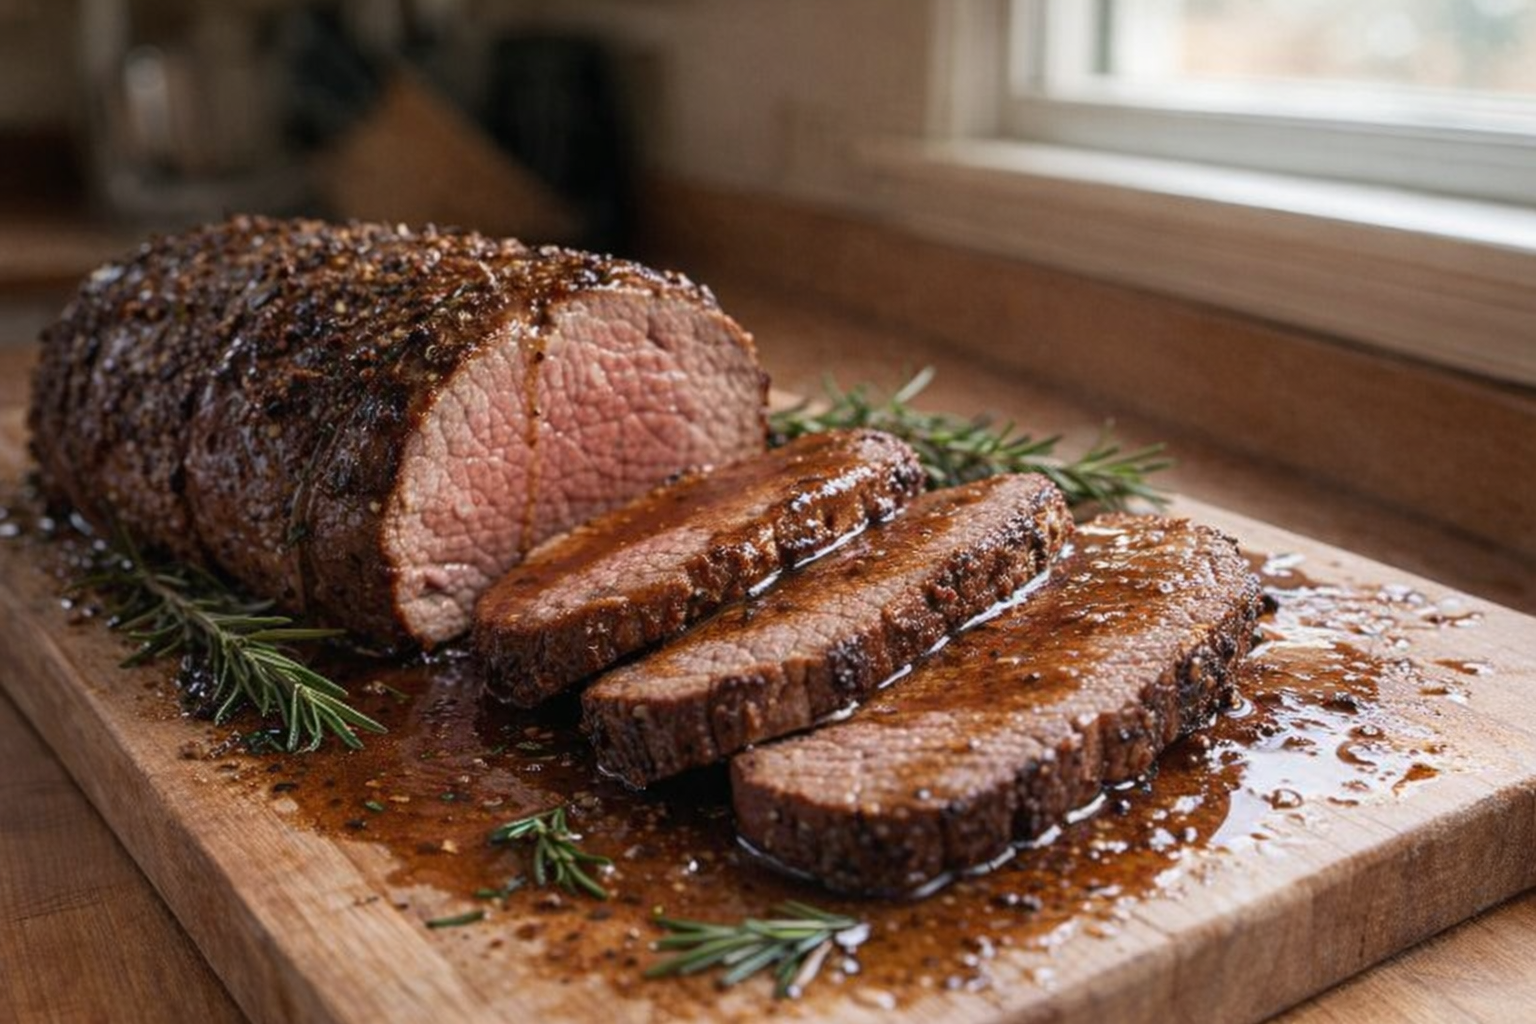
- Slice and Serve: Remove the kitchen twine from the rested tenderloin. Using a sharp carving knife, slice the tenderloin against the grain into 1/2-inch thick medallions. Arrange the slices on a platter and drizzle with the pan sauce. Serve immediately.

Cooking Time & Doneness Guide
Use a reliable meat thermometer inserted into the thickest part of the tenderloin to gauge doneness.
- Rare: 120-125°F (49-52°C)
- Medium-Rare: 130-135°F (54-57°C) – This is the recommended doneness for optimal tenderness and flavor.
- Medium: 140-145°F (60-63°C)
- Medium-Well: 150-155°F (66-68°C)
- Well-Done: 160°F (71°C) and above (Not recommended, as the meat will be dry and tough)
Visual Cues
While a thermometer is best, look for these visual cues:
- Medium-Rare: The meat will feel slightly firm to the touch with a springy texture. The center will be bright red, transitioning to pink towards the edges.
- Medium: The meat will feel firmer to the touch. The center will be pink with a thin ring of brown around the edge.
Tips for Perfection
- Don't Overcook: Beef tenderloin is best served medium-rare to medium. Overcooking will result in dry, tough meat.
- Let it Rest: Resting the meat after roasting is crucial for redistributing the juices and ensuring a tender, flavorful roast.
- Use a Hot Pan for Searing: A hot pan is essential for achieving a good sear. Make sure the butter is melted and shimmering before adding the tenderloin.
- Slice Against the Grain: Slicing the tenderloin against the grain (perpendicular to the muscle fibers) will make it easier to chew.
Storage & Reheating
- Storage: Store leftover roast beef tenderloin in an airtight container in the refrigerator for up to 3 days.
- Reheating: The best way to reheat sliced tenderloin is gently. Place the slices in a baking dish with a little beef broth or pan sauce, cover with foil, and heat in a preheated 300°F (150°C) oven until warmed through. Avoid microwaving, as this can dry out the meat.
Serving Suggestions
- With Creamy Horseradish Sauce: The sharpness of horseradish complements the richness of the beef.
- Alongside Roasted Vegetables: Roasted asparagus, Brussels sprouts, or carrots make excellent side dishes.
- As a Tenderloin Sandwich: Thinly sliced leftover tenderloin makes an excellent sandwich with horseradish mayo and caramelized onions on a crusty roll.
- Over Mashed Potatoes: Serve sliced tenderloin over creamy mashed potatoes, drizzled with pan sauce.
Frequently Asked Questions
For medium-rare, aim for an internal temperature of 130-135°F (54-57°C). Use a reliable meat thermometer inserted into the thickest part of the tenderloin to ensure accurate readings.
While beef tenderloin is the most tender cut, you could substitute with a sirloin roast or ribeye roast. Keep in mind that these cuts may require slightly different cooking times and might not be as consistently tender as tenderloin.
Leftover roasted beef tenderloin can be stored in the refrigerator for up to 3-4 days. Ensure it's properly wrapped in airtight containers or plastic wrap to maintain freshness and prevent it from drying out.
While searing adds flavor and a beautiful crust, you can skip it if you're short on time. The roast will still be delicious, but the exterior won't have the same level of browning or depth of flavor, consider broiling for a few minutes at the end to achieve similar results.